Shooting video outdoors often turns into a guessing game when you rely on a tiny DSLR screen. Glare hides your focus points, and harsh sunlight washes out your exposure levels completely. Finding the best budget camera monitor solves these daily production headaches without draining your wallet.
We spent weeks testing affordable external displays to see which ones actually survive real production sets. We checked peak brightness levels, applied custom LUTs, and evaluated the built-in exposure tools. Keep reading to discover which affordable screens deliver the professional monitoring features you actually need this year.
Quick Win: What is the Best Budget Camera Monitor Overall?
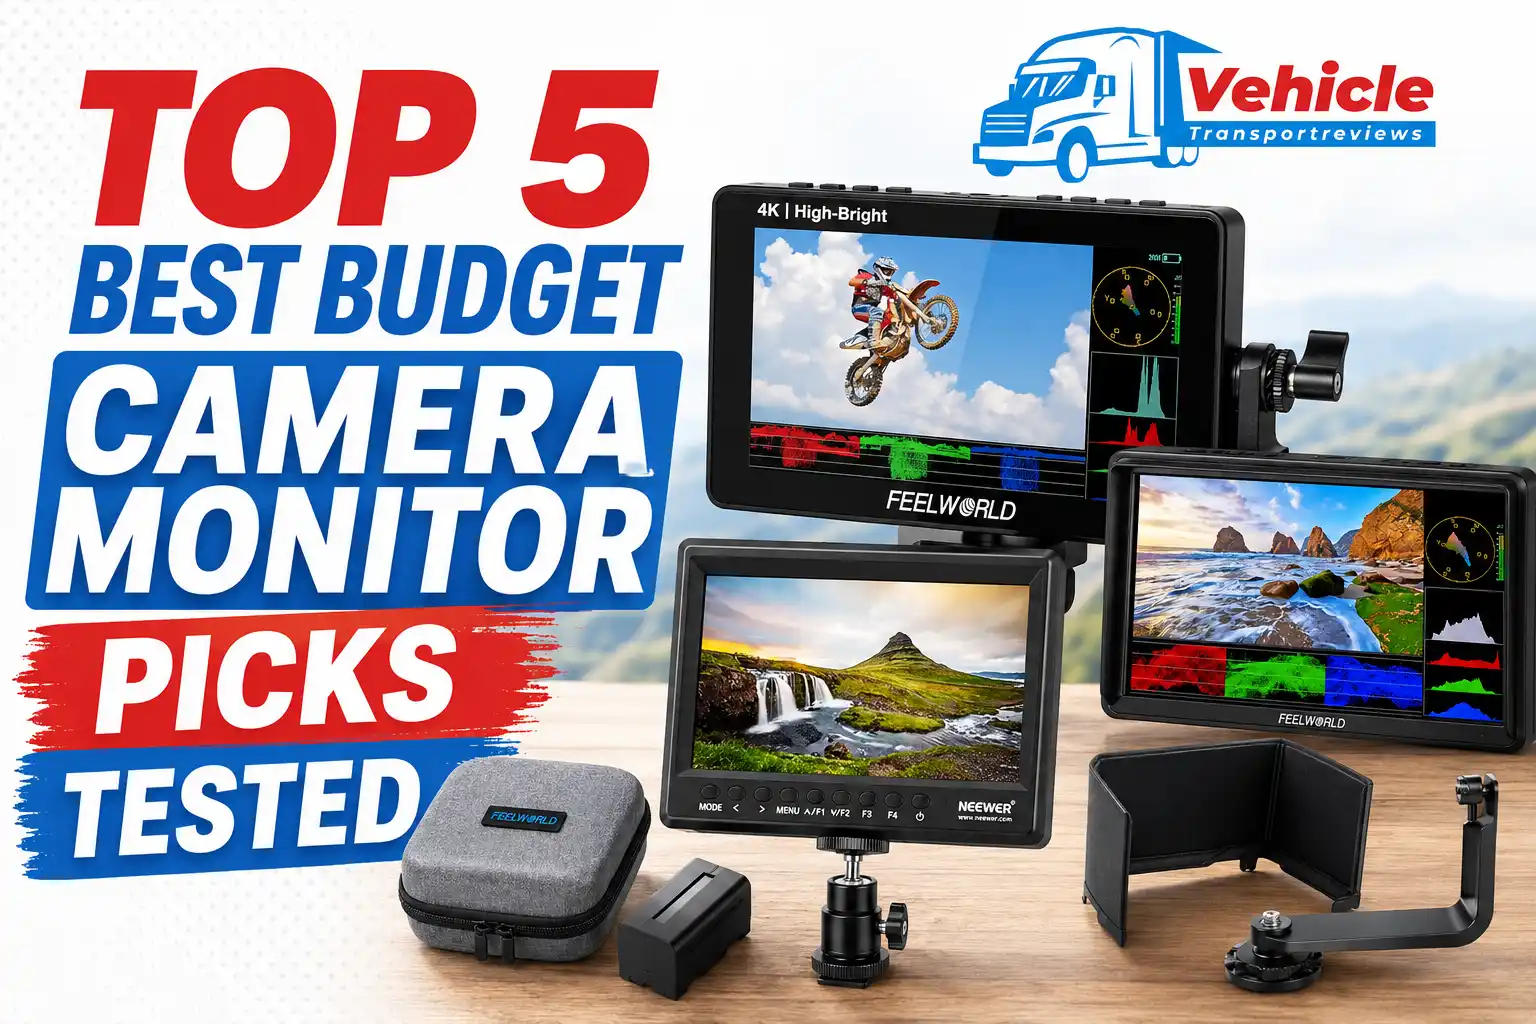
If you need a reliable screen right now, we highly recommend the FEELWORLD F5 Prox. We selected this as our overall winner due to its incredibly bright 1600-nit display and responsive touchscreen. Furthermore, it arrives as a complete filming kit with an F750 battery and carrying bag. You can start shooting immediately without buying expensive extra accessories.
Top 5 Best Budget Camera Monitors Compared
| Product Name | Best For | Standout Feature | Check Latest Price |
|---|---|---|---|
| FEELWORLD F5 Prox 5.5 Inch | Overall Value | 1600-nit screen and included battery kit | Check Latest Price |
| FEELWORLD S55 V3 6 Inch | Beginners | 4K HDMI loop-out with flexible power | Check Latest Price |
| NEEWER F100 7 Inch | Large Basic Screen | 7-inch display with an included sunshade | Check Latest Price |
| Osee T5+ 5.5 Inch | Custom LUTs | 1000-nit daylight screen with false color | Check Latest Price |
| NEEWER F700 7 Inch | Bright Outdoors | 2000-nit touch display with dual batteries | Check Latest Price |
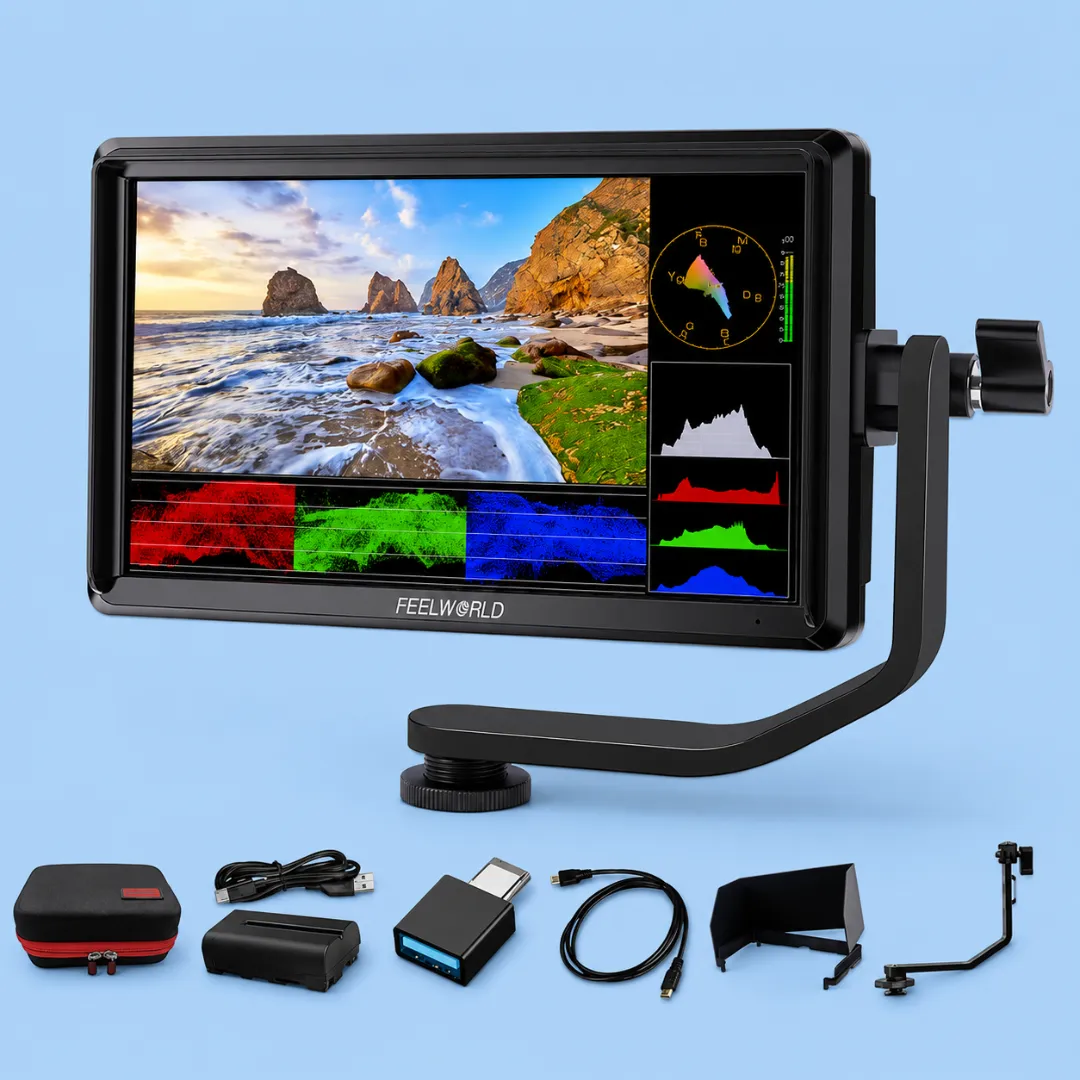
1. FEELWORLD F5 Prox 5.5 Inch – (Best Overall Value)
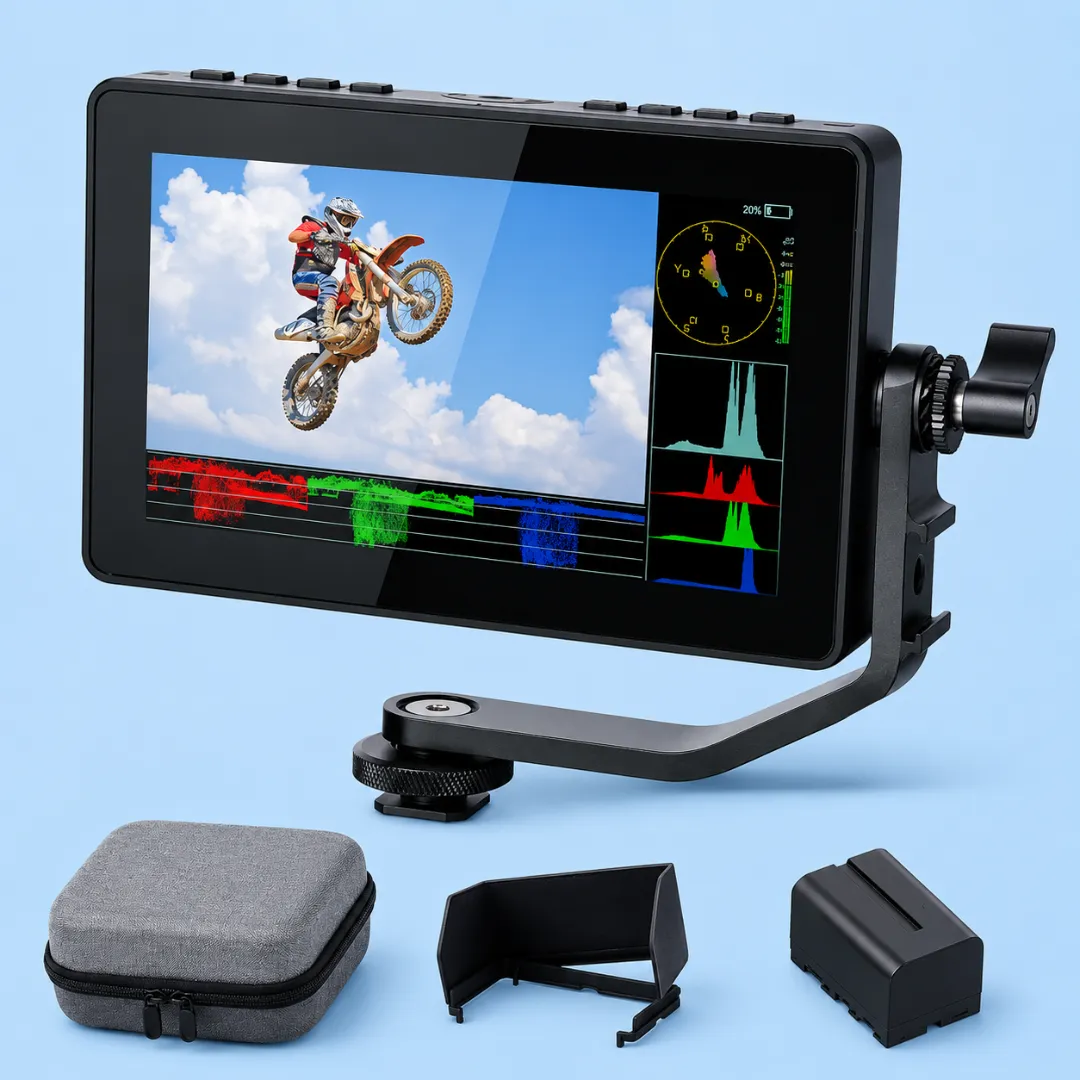
We tested this external monitor in bright sunlight to check its actual performance. The 1600-nit display is incredibly bright and highly visible outdoors. It completely eliminates the need to hide under a dark towel while shooting.
The responsive touchscreen makes navigating through heavy menus incredibly fast. You can quickly access focus peaking and false color tools with a simple tap. It feels just like using a modern smartphone on your camera rig.
This unit arrives as a complete filming kit ready for immediate use. You get an F750 battery, a carrying bag, and a helpful sunshade. It provides incredible value for videographers building their first professional setup.
Pros
- Ultra bright 1600-nit display screen.
- Highly responsive touchscreen menu system.
- Includes battery and carrying bag.
- Custom 3D LUT loading support.
- Lightweight build for gimbal use.
Cons
- Plastic casing feels somewhat fragile.
- Micro HDMI cable is short.
- Battery drain is relatively fast.
| Feature | Specification |
|---|---|
| Screen Size | 5.5 Inches |
| Peak Brightness | 1600 Nits |
| Interface | Touchscreen |
| Battery Included | Yes (F750 Battery) |
Who is this Best For
We highly recommend this monitor for run-and-gun videographers who shoot frequently outdoors. It provides a bright screen and essential exposure tools without a massive price tag.
Check Latest Price2. FEELWORLD S55 V3 6 Inch – (Best for Beginners)
We found this slightly larger six-inch monitor perfect for those needing more screen space. It uses a very sharp IPS display with excellent color reproduction. You can easily spot missed focus points before ruining a great video shot.
The 4K HDMI input and output loop is a highly useful feature. You can send your video signal to a larger director screen nearby. It also includes a handy headphone jack for monitoring live audio levels.
Powering this device is incredibly flexible for long shooting days. You can use standard NP-F batteries or Canon LP-E6 style batteries. The included tilt arm makes mounting it to your camera hot shoe very simple.
Pros
- Slightly larger six-inch display area.
- 4K HDMI loop out support.
- Flexible dual battery power options.
- Useful audio monitoring headphone jack.
- Included tilt arm for mounting.
Cons
- Lacks a touchscreen interface completely.
- Only features 500-nit screen brightness.
- Not ideal for harsh sunlight.
| Feature | Specification |
|---|---|
| Screen Size | 6 Inches |
| Peak Brightness | 500 Nits |
| Interface | Button Controls |
| Battery Included | Yes (NP-F Style) |
Who is this Best For
We suggest this display for new creators needing an affordable entry-level option. It works beautifully for indoor studio shoots where extreme screen brightness is unnecessary.
Check Latest Price3. NEEWER F100 7 Inch – (Best Large Basic Screen)
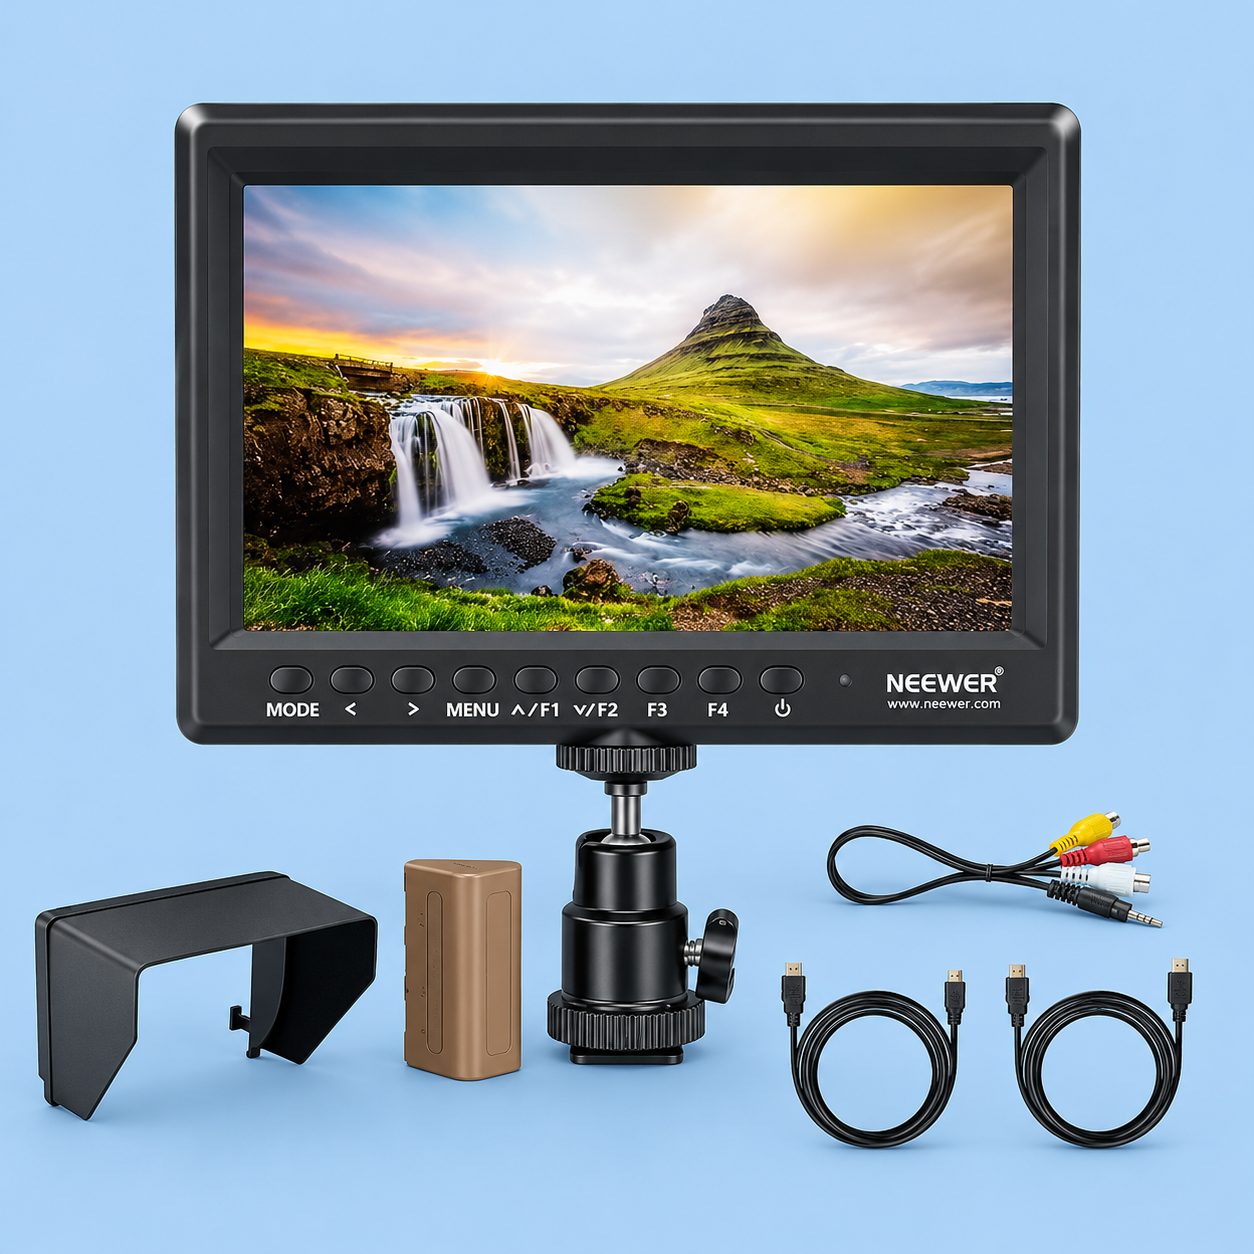
We attached this massive seven-inch screen to a tripod setup for studio testing. The extra visual real estate makes critical focus checking remarkably easy. It serves perfectly as a large director monitor for stationary interviews.
This unit relies entirely on physical buttons rather than a touch interface. The menu navigation takes slightly longer but feels very reliable. You can program the custom function keys for quick access to your favorite tools.
You will definitely need the included sunshade for any outdoor video work. The 450-nit brightness struggles against direct midday sunlight. However, the included battery and multiple video cables make this a solid starter package.
Pros
- Large seven-inch viewing screen area.
- Programmable physical custom function buttons.
- Includes battery and sunshade hood.
- Multiple video cables are provided.
- Great for stationary tripod setups.
Cons
- Screen is hard to see outdoors.
- Resolution is only 1280×800 pixels.
- Ball head mount feels weak.
| Feature | Specification |
|---|---|
| Screen Size | 7 Inches |
| Peak Brightness | 450 Nits |
| Interface | Button Controls |
| Resolution | 1280×800 Pixels |
Who is this Best For
We think this is the best budget camera monitor for studio shooters. The large screen size is fantastic for indoor product photography and talking head videos.
Check Latest Price4. Osee T5+ 5.5 Inch – (Best for Custom LUTs)
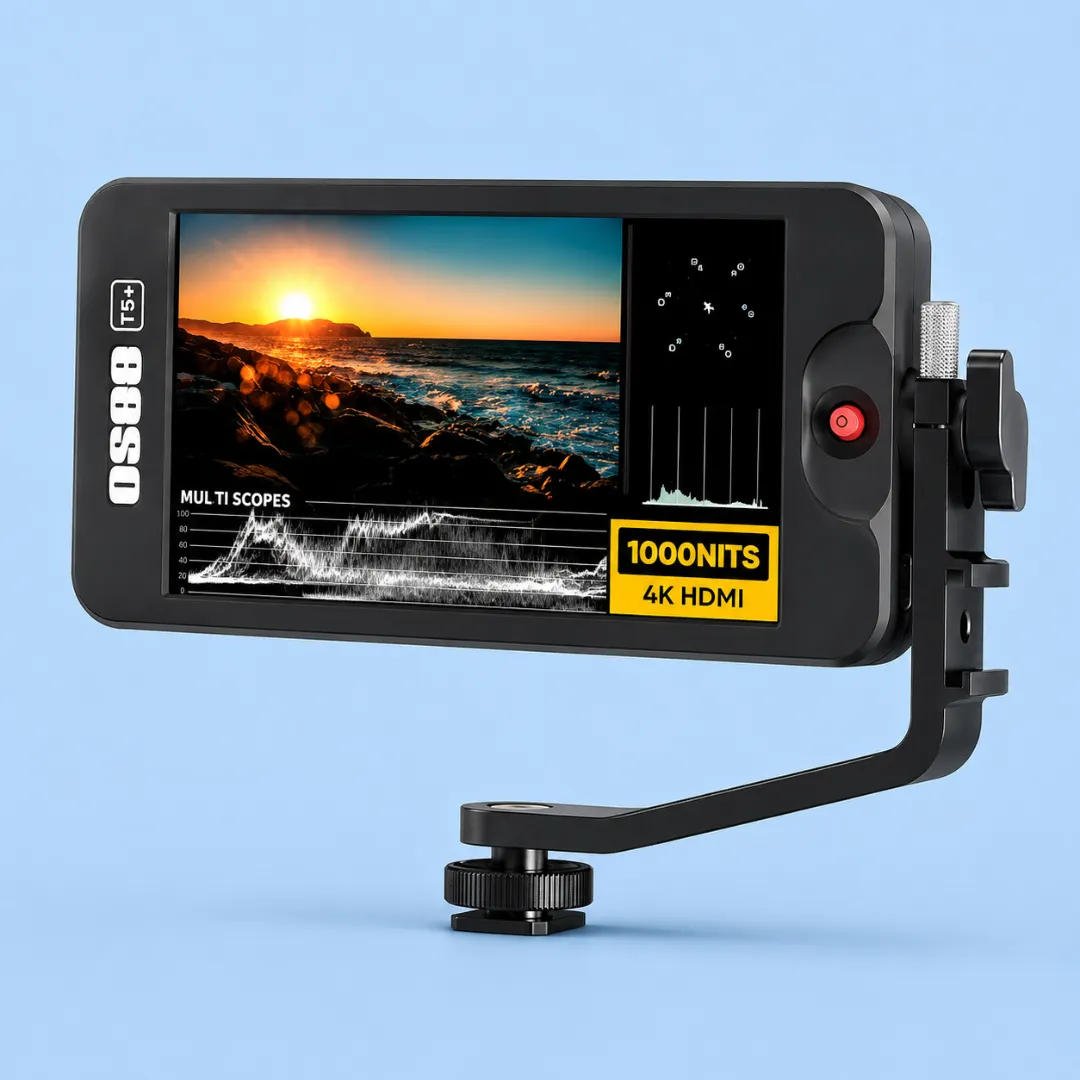
We instantly noticed the excellent color accuracy on this specific field monitor. The 1000-nit daylight screen provides crisp details without draining your battery instantly. You can load up to ten custom 3D LUTs via an SD card.
The exclusive false color tools are incredibly precise and highly customizable. You can set specific exposure values to protect your highlights and shadows perfectly. It takes all the guesswork out of exposing flat LOG video profiles.
The unique joystick control system allows for very fast menu navigation. You can quickly switch between eight different customized tool pages called MySets. This keeps your screen clear of clutter while you are actually filming.
Pros
- Highly accurate false color tools.
- Bright 1000-nit daylight viewable screen.
- Supports loading custom 3D LUTs.
- Innovative joystick menu control system.
- Very lightweight plastic housing design.
Cons
- Camera battery is not included.
- Joystick feels a bit fragile.
- Does not have touchscreen capabilities.
| Feature | Specification |
|---|---|
| Screen Size | 5.5 Inches |
| Peak Brightness | 1000 Nits |
| Interface | Joystick Control |
| Custom LUTs | Yes (Via SD Card) |
Who is this Best For
We highly recommend this unit for filmmakers shooting in flat LOG profiles. The accurate false color features ensure you nail your exposure in every single shot.
Check Latest Price5. NEEWER F700 7 Inch – (Best for Bright Outdoors)
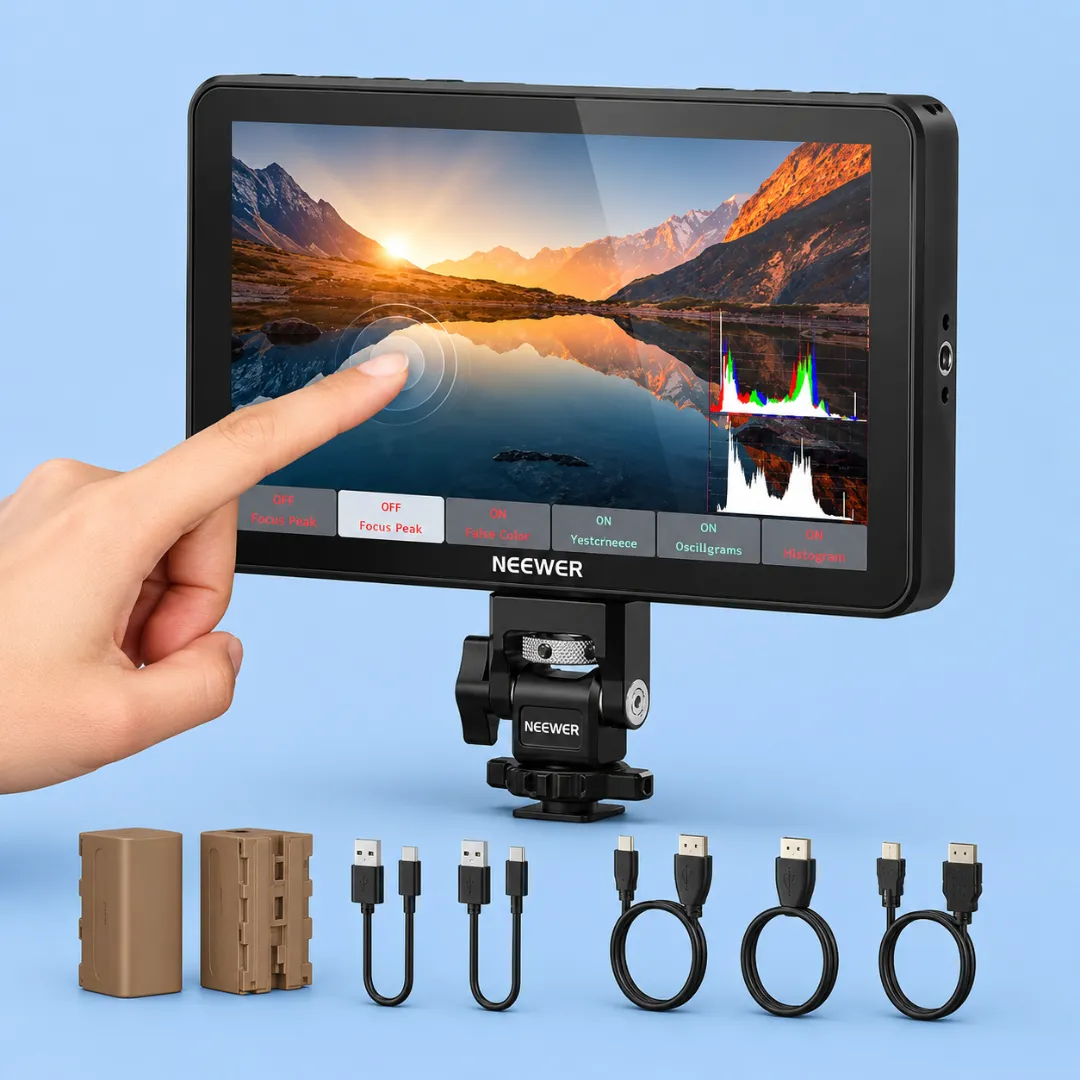
We took this heavy-duty monitor outside into direct midday sunlight for testing. The massive 2000-nit touchscreen cuts through harsh glare with absolute ease. You will never miss a critical focus point due to bad lighting again.
This large screen demands significant power to maintain that extreme brightness. It features dual battery slots to keep you running for hours. You get two large NP-F750 batteries included right in the box.
Heat buildup is a real concern with ultra-bright external displays. Neewer solved this by installing active cooling fans inside the rear casing. It keeps the internal components safe during long summer wedding shoots.
Pros
- Extremely bright 2000-nit display screen.
- Includes two large rechargeable batteries.
- Active cooling fans prevent overheating.
- Responsive touchscreen menu interface.
- HDMI loop out for 4K video.
Cons
- Very heavy with both batteries.
- Included HDMI cable is fragile.
- Cooling fan creates slight noise.
| Feature | Specification |
|---|---|
| Screen Size | 7 Inches |
| Peak Brightness | 2000 Nits |
| Interface | Touchscreen |
| Batteries Included | Yes (Two F750) |
Who is this Best For
We strongly suggest this monitor for commercial videographers working constantly in direct sunlight. The extreme brightness and dual batteries make it a highly dependable outdoor tool.
Check Latest PriceWhy Do You Need a Budget Camera Monitor?
Upgrading your video rig with an external display instantly improves your daily production workflow.
Achieving Perfect Focus Peaking
Missing focus ruins great video takes completely. Built-in camera screens are too small to show sharp details clearly. An external screen gives you a much larger viewing area to nail critical sharpness.
Focus peaking adds colored outlines to the sharpest edges in your frame. You can easily see exactly what is in focus before you hit the record button. This saves you hours of fixing soft footage later.
Viewing Screens in Direct Sunlight
Shooting video at high noon creates massive glare on standard camera displays. You cannot see what you are actually filming under harsh light. You often end up guessing your framing and exposure blindly.
High-brightness monitors push enough light to cut straight through that heavy sun glare. They act like a powerful flashlight pointing back at your eyes. This keeps your image highly visible during hot summer video shoots.
Applying Custom 3D LUTs
Many professional cameras shoot in flat LOG profiles to save maximum color data. These flat images look incredibly gray and washed out on a standard screen. It makes checking your actual lighting setup very difficult.
A good monitor allows you to load custom 3D LUTs directly via an SD card. This applies a quick color grade preview over your flat footage instantly. You see exactly how the final video will look while filming.
Framing with Cinematic Aspect Ratios
Modern video projects often require wide cinematic black bars for a dramatic look. Taping off the top and bottom of your camera screen is messy and inaccurate. It leaves sticky residue and ruins your gear eventually.
External monitors include built-in aspect ratio markers for easy visual framing. You can set the screen to display dark bars for a 2.35:1 cinematic crop instantly. This ensures your subject stays perfectly centered for the final edit.
Things to Consider Before Buying a Camera Monitor
Finding the right external screen requires checking several technical features before spending your money.
Screen Brightness and Nit Ratings
Monitor brightness is measured in nits. A standard indoor display usually pushes around 400 nits of light. This is perfectly fine for dark studios or heavily shaded areas.
Outdoor shooting requires at least 1000 nits to fight off heavy sun glare properly. If you are filming cars for car shipping companies california, you need extreme brightness. A 2000-nit screen guarantees perfect visibility under the midday sun.
Touchscreen vs Button Navigation
Touchscreens allow you to swipe through heavy menus just like a modern smartphone. This speeds up your workflow when you need to change settings rapidly. However, touch panels get covered in greasy fingerprints very quickly.
Physical buttons provide reliable tactile feedback during fast-paced video shoots. You can operate them easily while wearing heavy winter gloves. If you are reviewing the best driveway curb ramps outside in the cold, physical buttons are fantastic.
Battery Life and Power Options
Large bright screens consume battery power extremely fast during a long day. You must pack multiple large batteries to keep your rig running continuously. Many cheap screens do not include a battery in the box.
Look for displays that accept standard NP-F style rechargeable batteries. Some models even allow you to power the unit using a USB power bank. Having multiple power options prevents your screen from dying mid-shoot.
Supported Resolutions and HDMI Ports
You must verify that the screen supports the video resolution your camera outputs. A cheap monitor might fail to display a 4K video signal correctly. This leaves you with a blank screen on your shooting day.
An HDMI loop-out port is highly valuable for larger production sets. It sends the video signal to a second director screen nearby. If you are filming a best motorbike carrier installation, your director can watch remotely.
False Color and Exposure Tools
Histograms only provide a general idea of your overall image exposure. False color tools paint specific areas of your image with different bright colors. This shows you exactly where your image is too dark or too bright.
You can set skin tones to display as green or pink easily. This ensures your human subjects are always exposed perfectly. It completely removes the stressful guesswork from your daily lighting setups.
Weight and Gimbal Balancing
Adding a large screen and a heavy battery changes your camera weight significantly. This extra bulk makes balancing a motorized gimbal much more difficult. You might strain the gimbal motors if the rig becomes top-heavy.
Smaller five-inch screens work much better for handheld stabilizer setups. If you are recording footage for top car shipping companies in new york, keep your rig light. A heavy camera setup causes severe arm fatigue after several hours.
How We Tested These External Monitors
We put these budget screens through rigorous field tests to see how they handle actual video production environments. Our team took each display outside during bright midday sun. We evaluated the glare reduction and peak nit performance carefully. We wanted to see if the screens remained highly visible without relying heavily on a dark sunshade.
We also tested the built-in exposure tools extensively on location. We loaded custom 3D LUTs via SD cards to check the overall color accuracy. We verified the focus peaking accuracy against known sharp lenses to ensure no soft footage slipped through. Finally, we monitored battery drain over several hours to find the most reliable power solutions.
FAQs
Shoppers often ask important questions before adding an external display to their camera rig.
What is an on-camera field monitor?
An external screen plugs directly into your camera via an HDMI cable to provide a larger viewing area. It helps videographers check critical focus and exposure settings accurately before they hit record.
Do I really need 2000 nits of brightness?
You only need extreme brightness levels if you shoot frequently outdoors in direct midday sunlight. A 500-nit screen works perfectly fine for indoor studio shoots or heavily shaded environments.
Can I power a monitor with a USB power bank?
Many modern screens feature a USB-C input port for continuous power delivery. You can easily connect a high-capacity portable power bank to keep the display running during long production days.
What is false color in video production?
This exposure tool paints different brightness levels of your image with highly visible neon colors. It shows you exactly where your image is too dark or too bright for perfect lighting adjustments.
Will these external monitors record my video?
The screens on this list only display the live video feed coming from your camera lens. If you want to record the actual footage externally, you must purchase a much more expensive monitor recorder.
Do budget screens support 4K camera input?
Most modern affordable displays accept a 4K HDMI video signal from your camera without any issues. They simply downscale the heavy 4K image to fit their native 1080p high-definition screen resolution.
How do I mount a monitor to my camera?
You attach the screen to your camera hot shoe using a small tilt arm or mini ball head. These mounting brackets usually come included directly in the box with the screen itself.
Final Takeaways
Upgrading to a larger external display completely changes how you approach video production. You stop guessing your focus points and start shooting with total confidence every single time. Having the right tools prevents you from returning home with unusable soft footage.
The FEELWORLD F5 Prox stands out as the best overall choice due to its extreme 1600-nit brightness. It arrives as a complete kit so you can start filming immediately. If you need a massive viewing area, the NEEWER F100 provides excellent value for indoor studio setups.
Take the time to evaluate your normal shooting environments before picking a specific screen. Add one of these affordable displays to your rig and watch your daily production quality improve instantly.